Covering the overall build of my Willys M38 copy. The plan is to build a flat fender for general wheeling and holidaying around New Zealand.
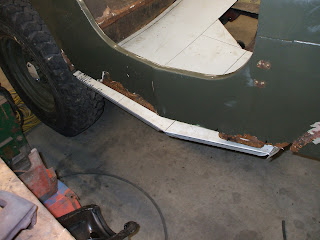
New floor, side and step
Get link
Facebook
X
Pinterest
Email
Other Apps
We folded up the basis of a new floor and new side panels. I cut out and Don showed me how to beat and fold up, then weld the replacement step. He made it look easy!
Been quietly plodding away on the Jeep still though haven't had the camera out there for a while so no posts. I've made up some roll cage mounts off of the chassis behind where the seats will mount and rebuilt the water pump with an omix kit. I've also fitted Toyota MR2 rear brake calipers and Suzuki Vitara rotors to the rear of the Jeep to make it 4 wheel disc braked and also the MR2 calipers provide a decent mechanical handbrake. Overall a pretty straight forward conversion with help from Don in designing the caliper brackets that bolt on to the stub axle flange. I've also had a crack at making the headers which has been a learning experience. I had to modify the front plate of the motor to fit my fuel pump in first so I had everything in that was going to be in the way. You can see in the picture below, the lower diaphragm (vacuum wipers) slots into the plate. Don had me draw up the flanges and get them laser cut at the same ti...
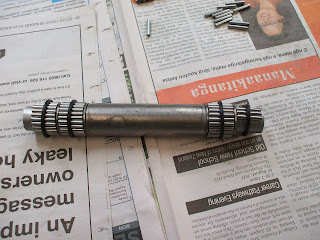
We reassembled the gearbox today and stripped and cleaned the transfer so I could order bearings as required. First 2 photos are of all the rollers o-ringed onto a dummy shaft that fits inside the gear shaft but is still short enough to drop down through the top of the gearbox. Once the shaft is in place you just push the dummy shaft out with the real shaft and you're done - nice and easy. 2nd pic is up the rear of the box with all the bigger rollers greased into place. I took the drive gear out of the box that came with my overdrive and it doesn't look too good. The previous owner has left it with water in the transfer so the gear has pitted. Will try and strip the overdrive Wednesday once the transfer is all assembled. If I'm lucky it will have fared better than the internals of the transfer. If not I may have to sideline that part until later on and just run without it to get it running. No problem either way - still plenty of ot...
Not too much progress last night. Modified mud guards and cut the pipe to mount them for 2 trailers. We got Dave's tub sitting down on the frame properly and Don worked his magic on one of the tail gates. They look pretty damn cool!


Comments
Post a Comment